The Case for Digital Contact Sheets

Whether I’m shooting digital or film, contact sheets are an important part of my editorial process. Taking pictures is only the first step in creating a new project: developing, researching, and editorializing all contribute to the final presentation of my work. While the workflow itself differs slightly when I’m working with film or digital, contact sheets are my favorite way to curate and annotate my photographs.

When it comes to the darkroom, contact sheets play a key role in determining what photos are worth printing. By exposing a sleeve of cut negatives directly onto photo paper, the photographer can view positives of an entire 35mm roll on a single sheet of 8x10 paper. Every enlargement costs materials and time to print, dry, and spot the final product. Contact sheets help the photographer craft their story and determine what photos are worth enlarging. The book “Magnum Contact Sheets”, which I reference frequently, gives a fascinating look into the mind and process of famous photographers like Robert Capa and Elliot Erwitt. The book shows contact sheets of Capa’s famous D-Day photographs and Erwitt’s capture of the “Kitchen Debate” between Nixon and Khrushchev, among many other famous photographs. I haven’t printed in the darkroom since college, but I still print digital contact sheets with my Canon PRO-100 at home.

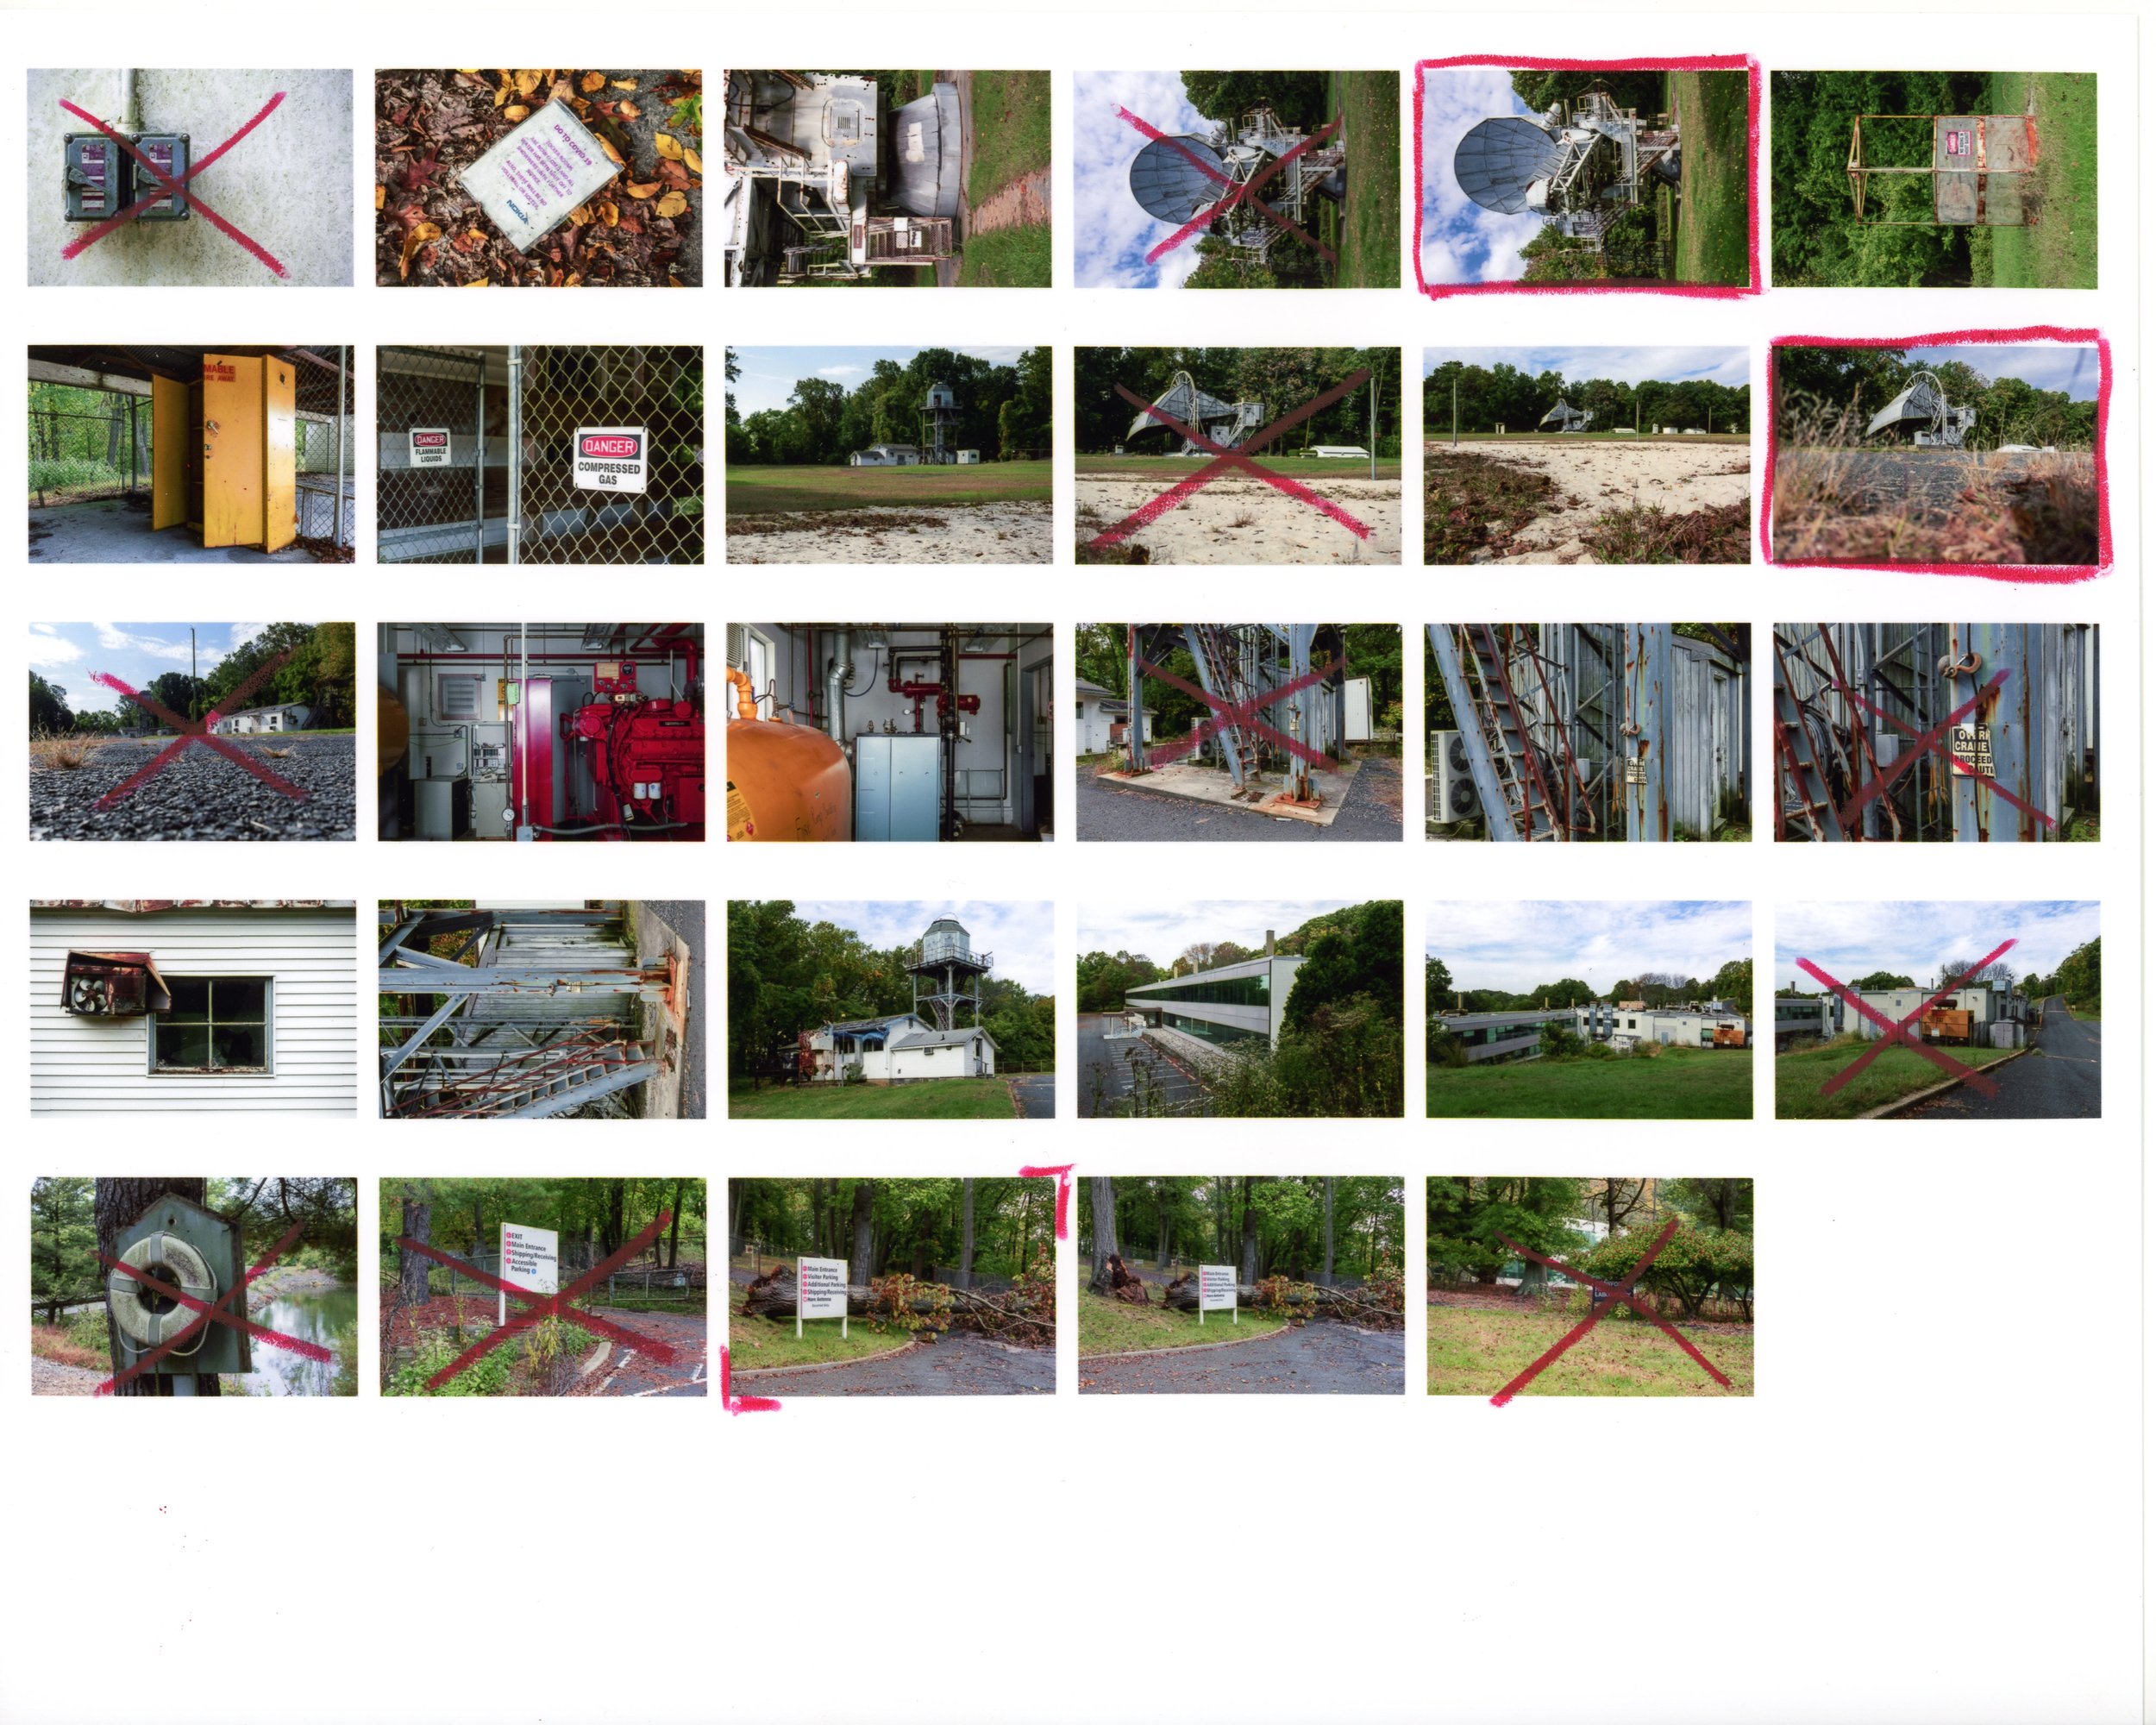
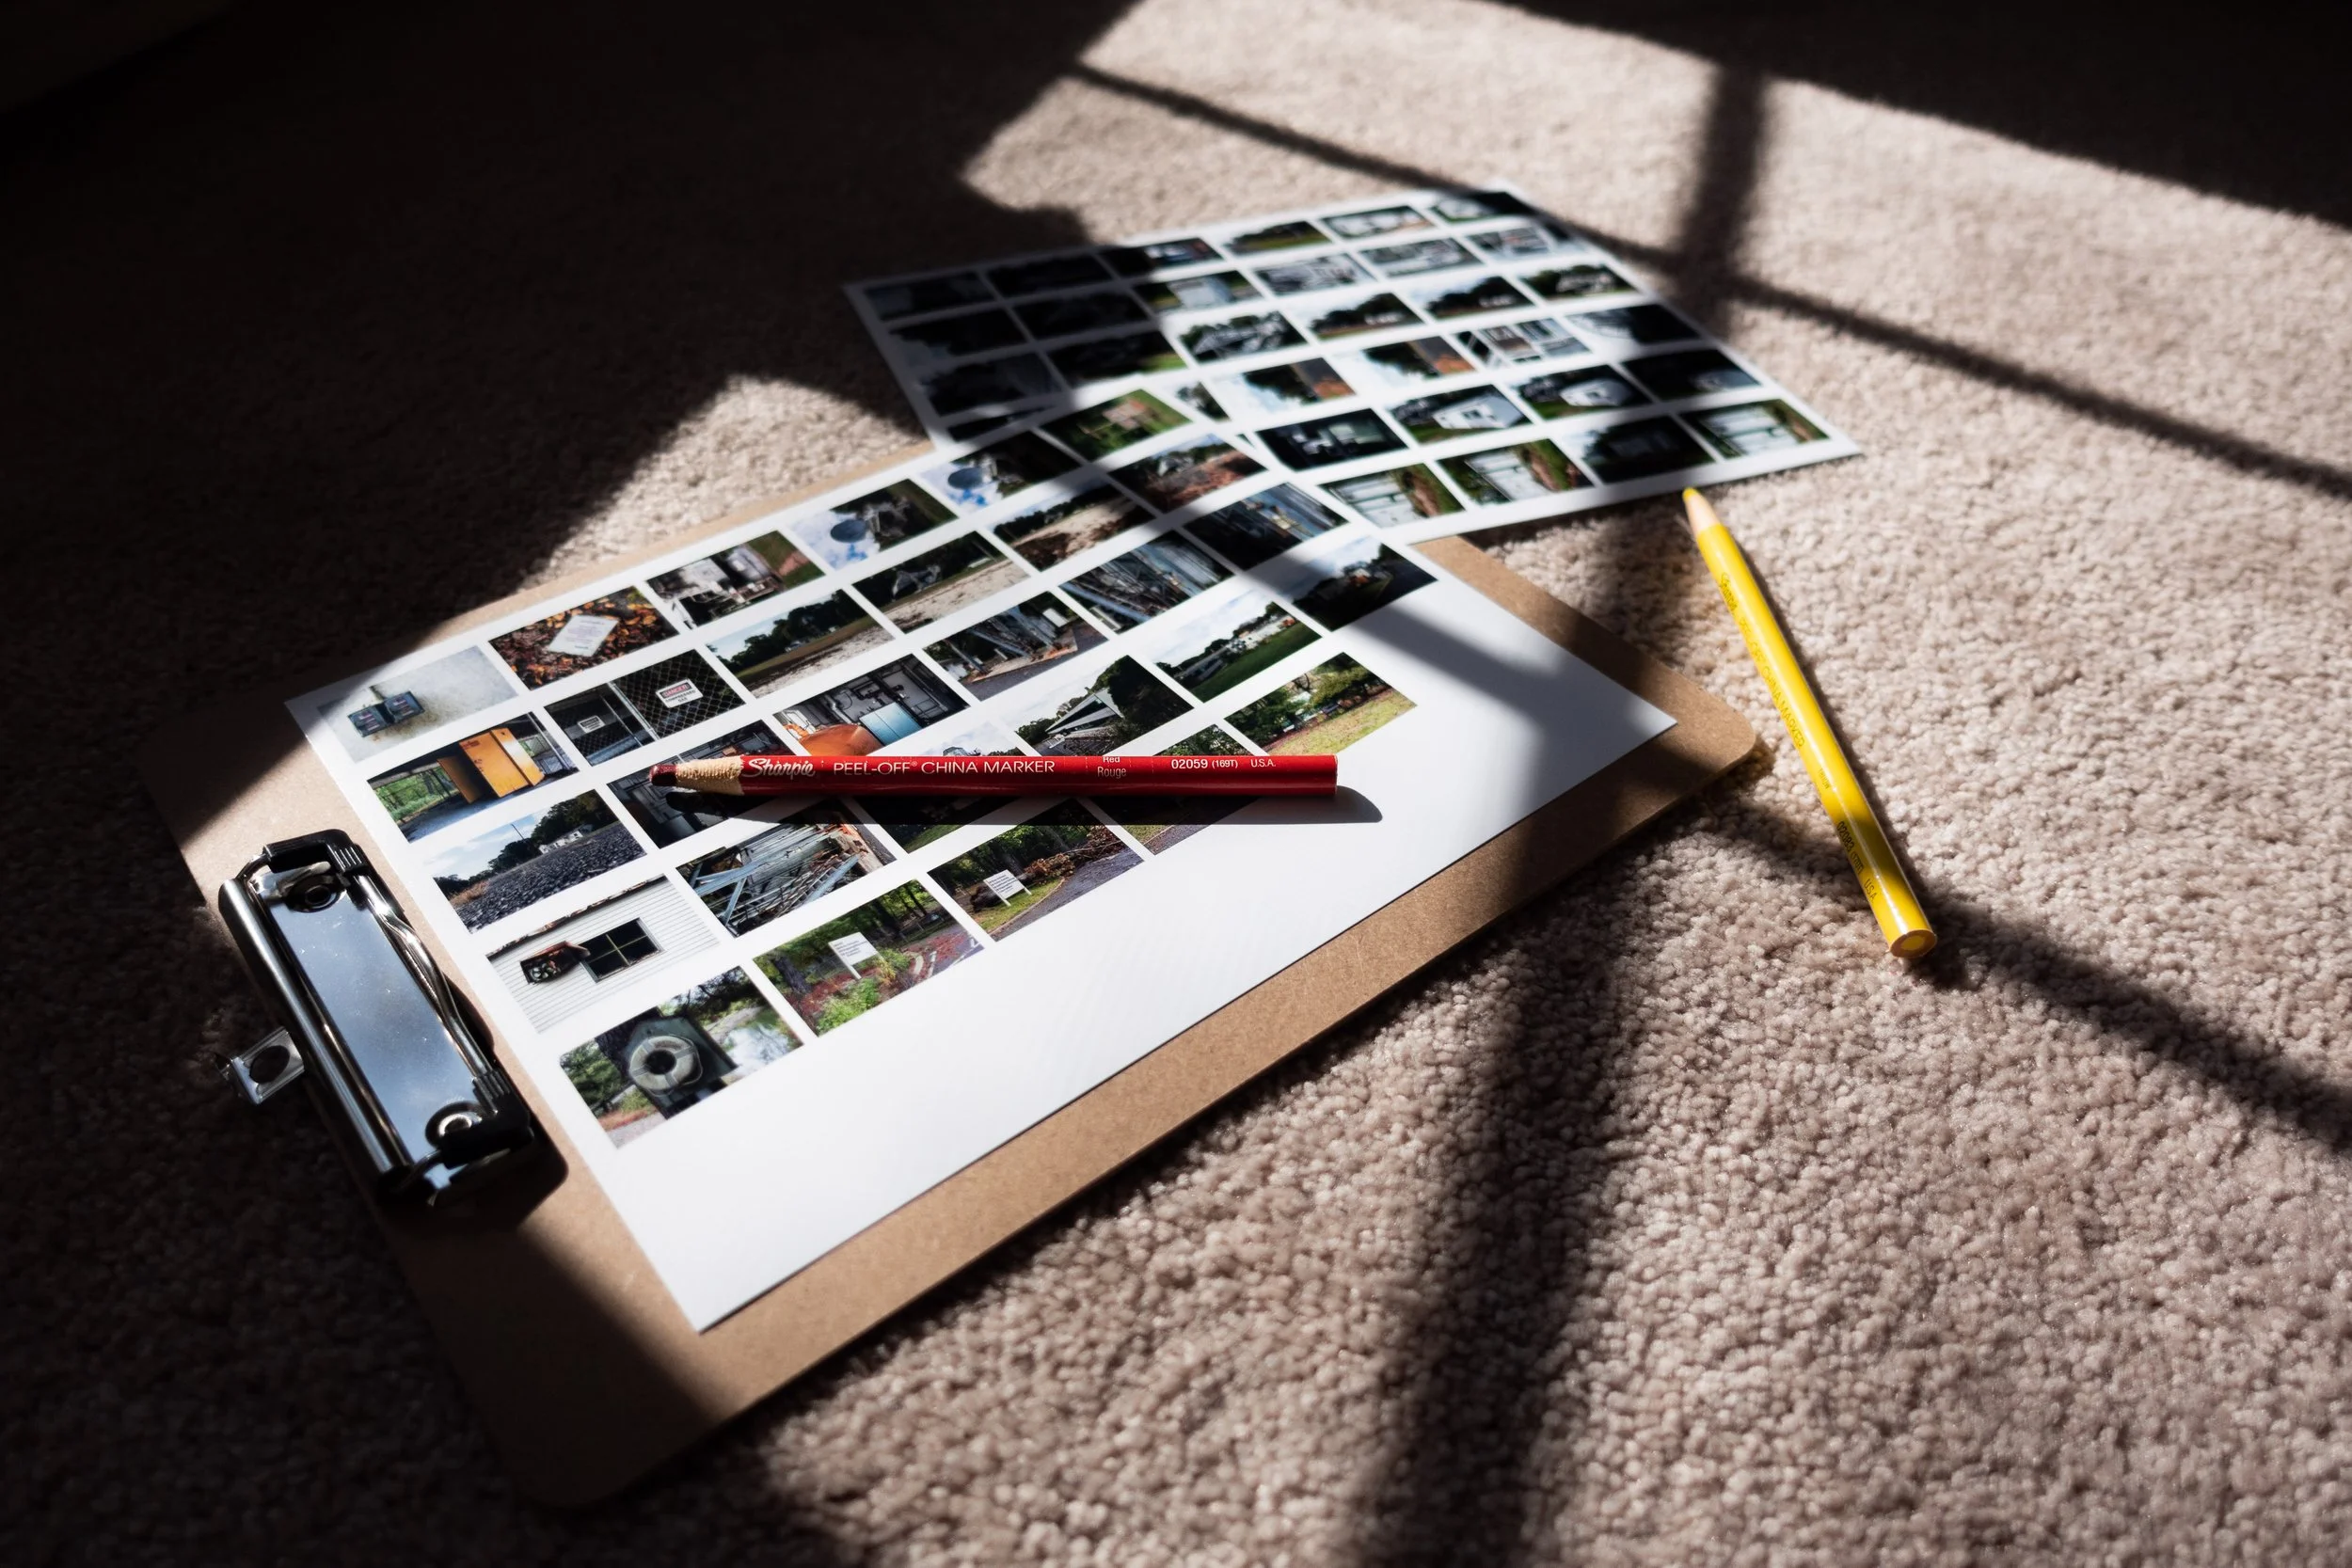
The process begins in Lightroom where I import my pictures for the first round of review, immediately rejecting any photos with glaringly obvious errors like terrible lighting, poor framing, camera shake, or missed focus. I then start tweaking the development settings of the remaining photos, getting them to a point where I can print a contact sheet. I have two different Lightroom preset that print 5x7 (35mm) or 3x4 (6x6) contact sheets on 8x10 paper, which I then review and annotate with grease pencil. I like Sharpie China Markers, red for color photographs or yellow/white for black & white.

The scans below are of some contact sheets I printed for the blog post I put together on The Holmdel Horn Antenna shot on my RX100VA - a box denotes a favorite, x a reject, and just the corners a crop. I’ve found that printing contact sheets and looking at them over multiple days helps me visualize the story I want to tell, weave my photographs into a cohesive narrative, and be more critical of my work. After I finish annotating a contact sheet, I’ll use it as a reference to construct the webpage layout and make any final edits to my images. I think there’s something about physically printing and annotating your photos by hand that will help you see them in a whole new light - give it a try!

Nikon F100 Metering System Selector Repair

I recently made some big changes to my camera collection including selling some of my least used systems in an effort to cut down on the amount of equipment in my dry cabinet. I sold my Bronica ETRS and Canon F1n, replacing them both with a Nikon F100 for 35mm work. I found the beautiful F100 above on eBay and I couldn’t believe it - the camera looked unused! Excited to see what it could do with my new FX lenses, I shot two rolls of Ferrania P30 during a day trip to Albany. Everything worked flawlessly except for one feature: the “Metering System Selector”. Located on the righthand side of the OFV, this selector is supposed to let you swap between spot, matrix, and center weighted metering. Mine was stuck on matrix, and I figured this out about 1/2 way through my first roll when I needed to spot meter for a backlit shot but didn’t see any movement when I changed modes. I have a pretty good feel for how over/under my meter readings are and made exposure compensation adjustments when necessary, but I spent the rest of the day frantically trying to figure why the F100 was stuck in matrix mode.

Turns out the “Metering System Selector” is the Achilles heel of an otherwise excellent camera. Over time, the contacts behind the selector oxidize and the metering system gets stuck at whatever mode the selector was left in. I did some research and found a few different solutions including sending the camera back to a Nikon service center (probably wouldn’t work in 2021), exercising the selector until it starts responding, and shooting some contact cleaner into the selector. I started with the least invasive option, moving the selector back and forth around 50 times without any signs of improvement. I always keep a can of contact cleaner on hand for general repairs but I was nervous to use it given the selector’s proximity to the pentaprism. Having exhausted my other options, I decided to give it a go.

I stuck some gaffers tape over the LCD screen and viewfinder, flipped the camera upside down, and shot some contact cleaner into the selector. After two rounds of applying contact cleaner and exercising the selector, I could finally get the camera out of matrix mode! I repeated this process six or seven times before all the modes worked reliably. I’ve found it helps to be decisive when changing metering modes because sometimes the camera will default back to matrix. Simply nudge the selector and it should jump back into the mode you selected. A word of warning – a bit of rubber came out from behind the metering system selector lock release button on the fourth shot of contact cleaner. I used some sharp tweezers to remove it. The rubber was clearly perished (another weak spot in the design?) but it hasn’t affected the camera operation thus far. I imagine it had something to do with the weather sealing, so it might not be wise to attempt this fix if you plan on taking your F100 into extreme environments. I’m not one to be hard on my equipment, so this wasn’t a concern for me.

And there you have it – how to fix an unresponsive Nikon F100 Metering System Selector!

35MM & 120 film with EPSON Scan

In the world of flatbed scanners, there are a lot of options for the software that runs the show. Some popular software options for the most common flatbed scanners are EPSON Scan, ViewScan, and SilverFast. I use EPSON Scan for my film on MacOS with a V600. I decided to write this post as a way to help out analog shooters getting started with film scanning since the options can be pretty daunting. Many photographers start scanning with the V600 because it's a great mix of convenience, quality, and cost. Look at the following screenshots; the numbers in this post correspond with what you need to click.

Using epson scan for 35mm & 120 film

To scan film, you'll need to remove the reflective document backing on the lid of the scanner. Open the scanner and pull up on the white cover under the top lid. It'll slide off and you'll see a clear strip of glass. This is needed to light your negative so the scanner can see the film. Run some compressed air over the scanner bed and load your film into the tray. The emulsion (opaque) side of your film should be facing up for both 35mm and 120 film.

Dust and curling film are the biggest threats in the scanning process. Flat film will always makes better scans, and extremely curly film can cause unsightly marks on the finished product. If you have the chance, pick up an antistatic cloth from Ilford to help control dust. Gently wipe the negatives with the cloth and remove any dust left over with compressed air before putting the film holder on the scanning bed. Dust on 120 film isn't terrible but it can ruin 35mm scans.

Place your loaded film holder on the scanning glass and line up the "A" tab with the corresponding spot for 35mm film or the "B" tab for 120 film . This tells the scanner what film holder you have and what size negative it should look for. Open the EPSON Scan software and select "Professional Mode" (1) from the dropdown in the top right of the window. Use the following settings (not saying these are the best, but it's what I use):

- (2) Document Type: Film
- (3) Film Type: Color Negative Film (or B&W Negative Film)
- (4) Image Type: 48-bit Color (16-bit Grayscale for B&W)
- (5) Resolution: 3200 dpi
- (6) Unsharp Mask: On

The unsharp mask is subjective, but I find scans without it can't be salvaged in Lightroom. Digital ICE is something you might want to consider using (this only works on color negatives) but it'll increase scan time. It works by using an infrared light to find and fix scratches on the negative, but I prefer to do that myself in Photoshop.

Look at the bottom of the EPSON Scan window and click "Configuration" (7). There's some things you'll want to change for a better preview scan to work with. Go to the "Preview" tab and set these options:

- Quality Preview (check this box)
- Thumbnail Cropping Area (move slider to "Small")

Quality Preview gives you a better idea of what your scans will look like in the next step, and setting the thumbnail cropping to "Small" will make the program trim the least amount of your image when scanning. You don't have to do this every time as your settings will save.

gCSQoh9.jpg

Click "Preview" (8). This will give you an overview of the negatives you put on the scanner. Go frame by frame and look at the images. Under the "Frame" (9) heading there's tools to rotate and flip your images if some of them aren't oriented correctly. You can also do this in Lightroom/Photoshop, but I usually just do it in the Preview window.

Next, you'll want to check the exposure of your images. Under the "Size" (10) heading, change the preview to show individual images. In the EPSON Scan panel, find the button that looks like a histogram (11). Click through your images and use the histogram tool to set the white and black points if they need adjustment. The button to the left of the histogram resets the automatic exposure, in case you need to undo your settings. Now that your images are loaded, correctly exposed, and free from dust it's time to scan. Go back to the multiple images view and click "Scan" (12). Change the file type to TIFF (*.tif), select your output destination, and click "OK". Let the scanner work its magic and soon you'll have high quality images to work with in Lightroom/Photoshop.